Note- For installation through CMD or command line, please go to Install Dot NET Framework 3.5 in CMD
In windows server 2012 R2, 2016 and 2019, Dot NET framework 3.5 does not come preinstalled. Sometimes, it require by multiple applications or it is prerequisite for many software’s.
Additionally, this is not only for the third party applications but also needed by inbuilt Microsoft Windows server roles or tools. Thus we will get to know how we can install dot net framework 3.5 in Windows server.
In this article, we will be using Windows server 2016, but most of the server operating systems has same steps to Install .NET Framework 3.5.
Step 1- Attach ISO or Windows DVD into server
For .NET framework 3.5 installation, you need to attach ISO file of same server version. You can also copy SXS folder only to your local drive from ISO. Later on, we will use to provide alternate path for installation files.
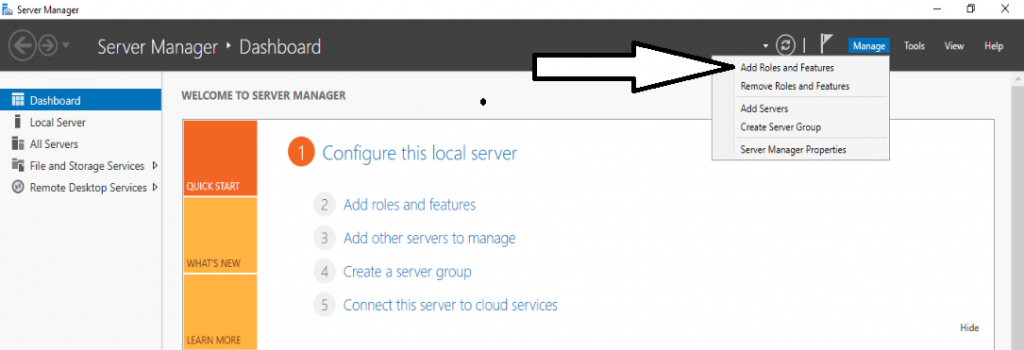
Step 2- Open Server Manager
Go to server manager and click “Add Roles and Features”

Step 3- Choose .NET Framework from features window
Follow instructions as per below screenshots and click next until you reach Features Window

Choose “Role-base or feature-based installation” on installation type window and click next.

Select your server from pool and click next.

Don’t choose anything on “Server Roles” window and click Next.

Check “.Net Framework 3.5 Features” on Features window and click next.

Step 4- Final- Specify alternate path of SXS folder
Here you need to specify the alternative path of SXS folder in your iso. Either you can copy path from iso/dvd or you can copy SXS folder to local computer drive and provide path here.

Enter SXS folder path here and click OK.

Finally, click on Install button and wait for few minutes to complete the installation.


Now .NET framework 3.5 is successfully installed in your server computer.
